Step-by-Step Guide for Installing and Removing SFP Transceivers
SFP (Small Form-factor Pluggable) transceiver modules are widely used for connecting network devices such as switches, routers, and servers. They provide high-speed data transmission and allow flexibility in choosing different types of fiber optic or copper cables depending on the needs of the network.
In this step-by-step guide, we will walk you through the process of installing and removing SFP transceiver modules to ensure proper handling and avoid damage to the module or network devices.
What You’ll Need:
SFP Transceiver Module – Choose the appropriate module based on your network requirements (e.g., 1G, 10G, or fiber optics/copper).
Static-Free Environment – Always ground yourself and work in a static-free environment to avoid damaging sensitive components.
Compatible Networking Equipment – Ensure the switch, router, or other network devices support SFP modules.
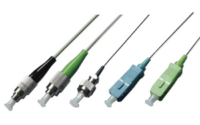
Fiber Optic or Copper Cable (depending on the transceiver type).
How to Install an SFP Transceiver Module
Follow these steps to properly install the SFP module:
Step 1: Prepare the Environment
Before you start, ensure the device is powered off. This helps prevent any electrical damage during the installation. Also, discharge any static electricity by grounding yourself with an anti-static wrist strap or by touching a grounded metal surface.
Step 2: Identify the SFP Slot
Locate the SFP (or SFP+) slot on your networking device (e.g., switch or router). These slots are often marked with an “SFP” label near them.
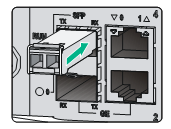
Step 3: Insert the SFP Module
Align the Module: Take the SFP module in your hand and carefully align it with the SFP slot. Make sure that the metal connectors of the module match the connectors in the slot.
Insert the Module: Gently push the module into the slot until it clicks into place. Avoid using excessive force; the module should fit securely but should not require force.
Step 4: Connect the Cable
Once the SFP module is securely installed, connect the appropriate cable (fiber optic or copper) to the module. Fiber optic cables should be connected with proper care to avoid damaging the delicate fibers.
Step 5: Power On the Device
Turn the networking device back on and check the indicators on the SFP module. Usually, there will be a green LED light indicating the module is powered on and functioning correctly.
How to Remove an SFP Transceiver Module
Properly removing the SFP transceiver is just as important as installing it. Here’s how to do it safely:
Step 1: Power Off the Device (if necessary)
If your device requires powering down before removing the SFP module, ensure the device is turned off. Some devices support hot-swapping, meaning the module can be removed while the device is still on. Check your device’s documentation to confirm.
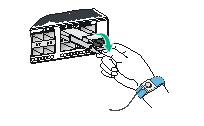
Step 2: Release the Latch
SFP modules often have a small latch or clip that secures them in the slot. Gently pull the latch or clip back to unlock the module. Some devices might require you to press a button or latch to release it.
Step 3: Gently Pull the Module Out
Once the latch is released, hold the module by its metal casing and gently pull it out of the slot. Avoid using excessive force, as this could damage both the module and the device.
Step 4: Store the SFP Module
If you plan to reuse the SFP module later, store it in a static-free container to protect it from static damage. Avoid touching the connectors of the module.
Step 5: Disconnect the Cable
Finally, disconnect the cable from the SFP module, making sure you handle the fiber optic cable properly to avoid damage
Tips for Handling SFP Transceivers
Avoid Touching the Connectors: Always handle SFP modules by the edges. Avoid touching the electrical connectors or the fiber optic ports to prevent contamination or damage.
Ensure Proper Ventilation: When installing multiple modules, ensure your device has proper cooling to avoid overheating.
Check Compatibility: Make sure the SFP module is compatible with the device you’re installing it into. Check the model and specifications before inserting the module.
In Conclusion
Installing and removing SFP transceivers is a straightforward task that requires careful handling to ensure optimal performance. By following these simple steps, you can ensure that your network devices are equipped with reliable and fast connectivity while also preserving the integrity of the transceivers and the devices.
If you have any doubts or need further assistance with SFP modules or other networking hardware, visit TARLUZ.com or contact our experts for personalized advice.. Happy networking!
Related post: Click here!

How to Know DAC High Speed Cable? Just Three Minutes
Introduction to PM Fiber Optic Products